Snapshot Testing Neural Networks
In this post, I’m mainly going to explain a bit about what snapshot testing is some pros and cons and how I approached it for an audio processing project at work. And testing a library that is a wrapper around a neural network with some bonus logic.
What Are They?
Snapshot testing is when we take a “snapshot” of the output or state of the program and store that alongside the tests. Then when running the test against our code, generate the same output and then compare that output with our previously stored version.
You may have seen this used by the Rust compiler if you’ve ever poked into its diagnostic tests. In Rust there’s a handy crate for snapshot testing called insta.
Of course, sometimes our tests will fail, when that happens we will either confirm it’s an issue and fix our code or confirm the new snapshot is correct and replace the old one. Sometimes it’s a mixture of the two if we’ve partially broken something when adding a feature.
The benefit of this approach is we can hit a large amount of our code with tests on realistic data/scenarios and do this much quicker than crafting test cases manually. A negative is that the more your outputs change or the harder snapshots are to review the greater tendency people might have to just blindly “bless” the new snapshots resulting in tests that aren’t helping you.
Introducing the Project
So at my work Emotech I spend a lot of time working on audio AI systems. Often, we want to limit these models to just running on speech data and not any background noise or dead air. For that, we use some form of audio segmentation model such as a Voice Activity Detection (VAD) model. We recently open-sourced a Rust library around a popular one silero which you can find here.
For explaining all of this we do need to know a bit about how the VAD works internally. So buckle up!
Inside the VAD we have a positive and a negative speech threshold. These function together as a hysteresis, so in some Rust-flavoured pseudo-code:
let likelihood = vad.run(audio_frame);
if last_state == State::Silence {
    if likelihood > positive_speech_threshold {
        last_state = State::Speaking;
    }
} else { // We're speaking there're only two states
    if likelihood < negative_speech_threshold {
        last_state = State::Silence;
    }
}
We also don’t want to trigger too eagerly and catch a lot of vocal filler that can largely be regarded as noise. So there’s a minimum speech duration before we emit an event.
But as well as that we don’t want to turn off too eagerly and cut someone talking off! So once we switch to silence we wait for a “redemption” duration and if no speech frames come in that time window we report the last timestamp as the first of those silent frames and emit another event. And if a speech frame comes in we reset the count.
So our Rust flavoured pseudo-code will turn into something like:
let likelihood = vad.run(audio_frame);
if last_state == State::Silence {
    if likelihood > positive_speech_threshold {
        last_state = State::Speaking;
        speech_start = audio_frame.start_time;
        redemption = 0;
        is_speaking = false;
    }
} else { // We're speaking there's only two states
    if likelihood < negative_speech_threshold {
        redemption += 1;
        if redemption > threshold {
            last_state = State::Silence;
            emit speech_end
        }
    } else {
        redemption = 0;
        if !is_speaking {
            duration = audio_frame.end_time.duration_since(speech_start);
            if duration > min_speech_duration {
                emit speech_start
            }
        }
    }
}
There’s some extra complexity with handling the vad frames vs samples vs timestamps, but this is pretty close to all the details! There is some mutable state that is tracked and updated based on more data coming in which is part of what makes testing so important. Also, we currently apply a pre-speech padding which would be an extra saturating subtraction when emitting the speech start event I haven’t shown.
Snapshot Testing the VAD
Part of making such a library is to test it and make sure it works well so we can have confidence throughout our stack. The model has been ran on a lot of benchmarking data (typically hours) and we have an idea of it’s accuracy. However, there are some nuances in using a VAD model and configuration which may not be tested by that approach. Things like:
- Different audio chunk sizes going in
- Different padding values - the silence we allow at the start/end of the audio
- Switching speed (sometimes you want to limit the max speaking/non-speaking transition)
- Sensitivity
So an easy way to test this is to generate some test audio and then run all the audio through the VAD with different parameters and chunkings. And utilise snapshot testing to make sure they’re all as expected. Plus by running on representative data we can increase our confidence things work as expected!
But because of this, while it’s useful we really can’t use insta.
A text diff of our structures isn’t useful, long float arrays of durations and timestamps. These are things that you can’t review as text diffs. And with that, we lose a lot of insta’s DX improvements.
Instead, there’s going to be a slightly different approach.
- Implement a test function that takes in the means to run the model
- Run through our dataset with the given configuration
- Generate and save a snapshot in the target directory
- Load the reference snapshot from our test directory
- For each file compare the snapshots
- Highlight areas where they differ and provide a script to plot snapshots and help debug
Replacing snapshots will then be manually done by the user because the investigation might take deeper analysis the workflow is designed for less immediate responses.
The snapshots I chose to save in JSON for some human readability and the Rust structs I save the data into are as follows:
#[derive(Default, Debug, PartialEq, Deserialize, Serialize)]
struct Summary {
    input_size_ms: usize,
    config: VadConfig,
    summary: BTreeMap<PathBuf, Report>,
}

#[derive(Default, Debug, PartialEq, Eq, Deserialize, Serialize)]
struct Report {
    transitions: Vec<VadTransition>,
    current_silence_samples: Vec<usize>,
    current_speech_samples: Vec<usize>,
}
To explain some of the fields in the Report type:
transitions- a vad transition is a speech start/end event emitted by the modelcurrent_silence_samples- number of silent frames going from the end of the audio to the last speech framecurrent_speech_samples- length of the last contiguous chunk of active speech
Current speech samples and current silence samples will grow at the same time until the redemption frame threshold is hit, then speech frames will jump back as the timestamp is corrected whereas silence will continue increasing. This is a bit of an interesting behaviour which isn’t always immediately obvious to people looking at the VAD debugging.
In future we want an API for the neural network outputs so we can record them to see how they move above and below the positive and negative thresholds.
The actual snapshot testing code is pretty simple:
- Run model on each audio updating the summary struct
- Load snapshot
- Check
The only thing that is slightly atypical is that I don’t just assert_eq on the
two Summary objects and call it a day. Aside from the floating point
parameters in the VadConfig this doesn’t feel like the right approach.
Namely, because the Vec<usize> fields can be hundreds of elements long and the
debug printout is frankly not useful (though debug is derived in case someone
wants to look at it).
Instead our checking of the snapshots looks like the below:
println!("Checking snapshot is generated with same configuration!");
compare_configs(&summary.config, &expected.config);
assert_eq!(summary.input_size_ms, expected.input_size_ms);

let mut failing_files = vec![];
println!();

for sample in summary.summary.keys() {
    let baseline = &summary.summary[sample];
    let current = &expected.summary[sample];

    if baseline != current {
        println!("{} is failing", sample.display());
        if baseline.transitions != current.transitions {
            println!("\tDifference in transitions list!");
        }
        if baseline.current_silence_samples != current.current_silence_samples {
            println!("\tDifference in silence lengths");
        }
        if baseline.current_speech_samples != current.current_speech_samples {
            println!("\tDifference in speech lengths");
        }
        failing_files.push(sample.to_path_buf());
    }
}
if !failing_files.is_empty() {
    println!();
    println!("You have some failing files and targets. If you get a snapshot file and audio you can plot it via our plot_audio script e.g.");
    println!();
    println!(
        "python3 scripts/plot_audio.py -a {} -i {}",
        failing_files[0].display(),
        current_report.display()
    );
    println!();

    panic!("The following files are failing: {:?}", failing_files);
}
Notice that we print out a Python command you can run to debug the first file with a deviation in the results! After altering a snapshot to make it fail I got the following printout:
running 6 tests
test chunk_20_default_params_8k ... ok
test chunk_20_default_params_16k ... FAILED
test chunk_50_default_params_8k ... ok
test chunk_50_default_params_16k ... ok
test chunk_30_default_params_8k ... ok
test chunk_30_default_params_16k ... ok

failures:

---- chunk_20_default_params_16k stdout ----
Loading snapshot from: /home/xd009642/work/silero-rs/tests/data/chunk_20_16000Hz_default.json
Checking current results target/chunk_20_16000Hz_default.json with snapshot /home/xd009642/work/silero-rs/tests/data/chunk_20_16000Hz_default.json
Checking snapshot is generated with same configuration!

tests/audio/rooster.wav is failing
	Difference in speech lengths
tests/audio/sample_1.wav is failing
	Difference in transitions list!

You have some failing files and targets. If you get a snapshot file and audio you can plot it via our plot_audio script e.g.

python3 scripts/plot_audio.py -a tests/audio/rooster.wav -i target/chunk_20_16000Hz_default.json

thread 'chunk_20_default_params_16k' panicked at tests/snapshot.rs:182:9:
The following files are failing: ["tests/audio/rooster.wav", "tests/audio/sample_1.wav"]
note: run with `RUST_BACKTRACE=1` environment variable to display a backtrace


failures:
    chunk_20_default_params_16k

test result: FAILED. 5 passed; 1 failed; 0 ignored; 0 measured; 0 filtered out; finished in 0.92s

error: test failed, to rerun pass `--test snapshot`
And if I run the command:
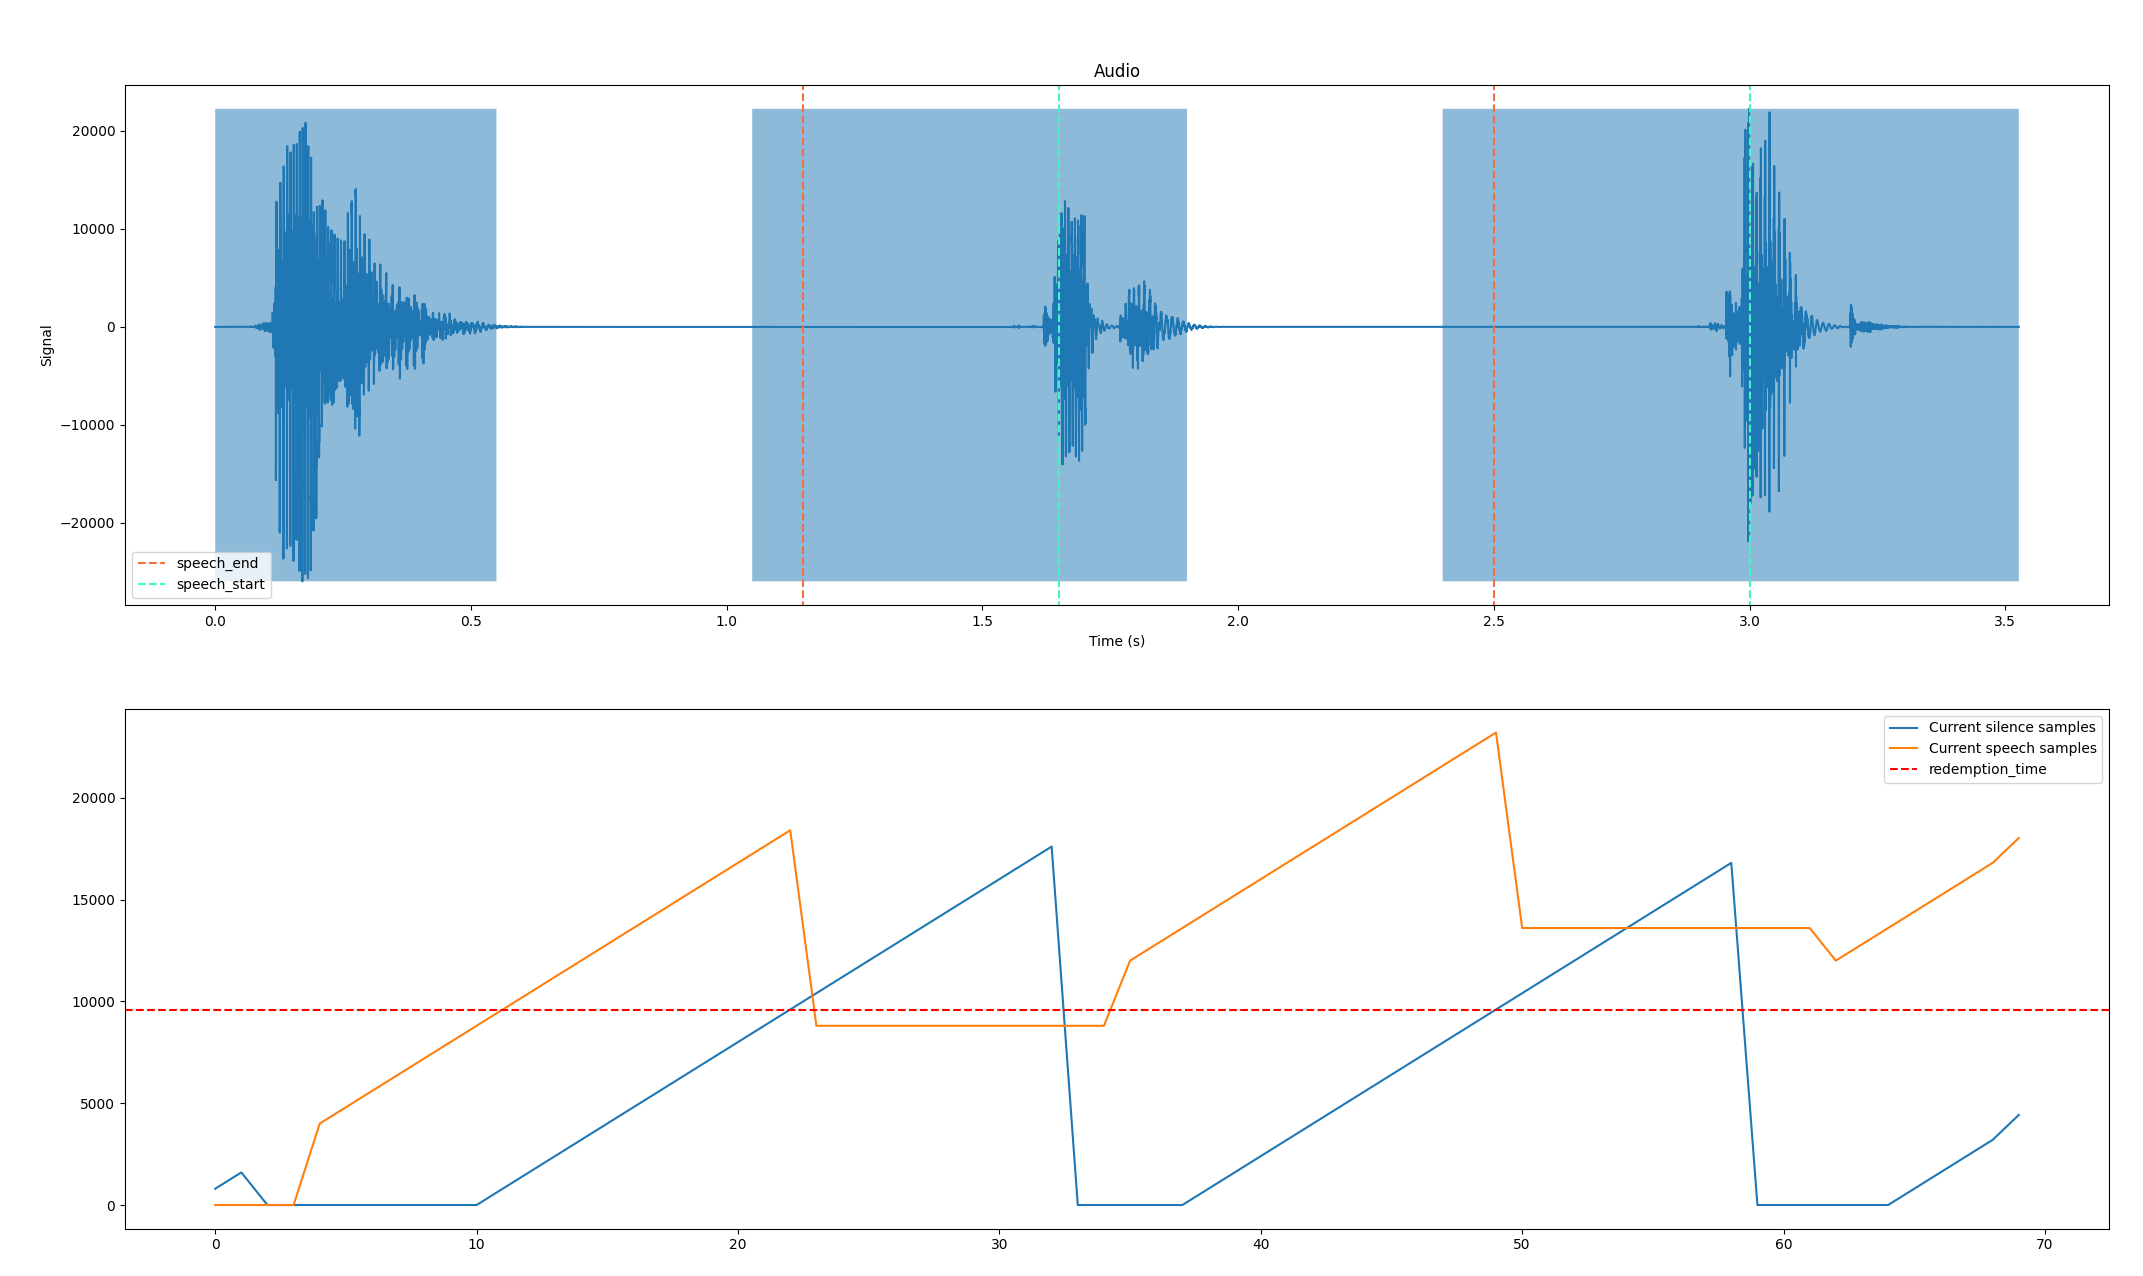
So in the top plot, we can see the audio wave and the shaded areas show where the VAD thinks speech is. The green dashed line shows where the VAD started with the pre-speech padding removed when we’re confident with the location (this is hard to tell at the start of the audio). The red line shows when the redemption threshold was hit and the end event was emitted.
In the plot below we track the silence and speech samples with a dotted line for the redemption threshold. We can see the blue line intersecting the dotted line coincides with the redemption frame marker in the top plot as well as the speech frame length decreasing as the correct is applied.
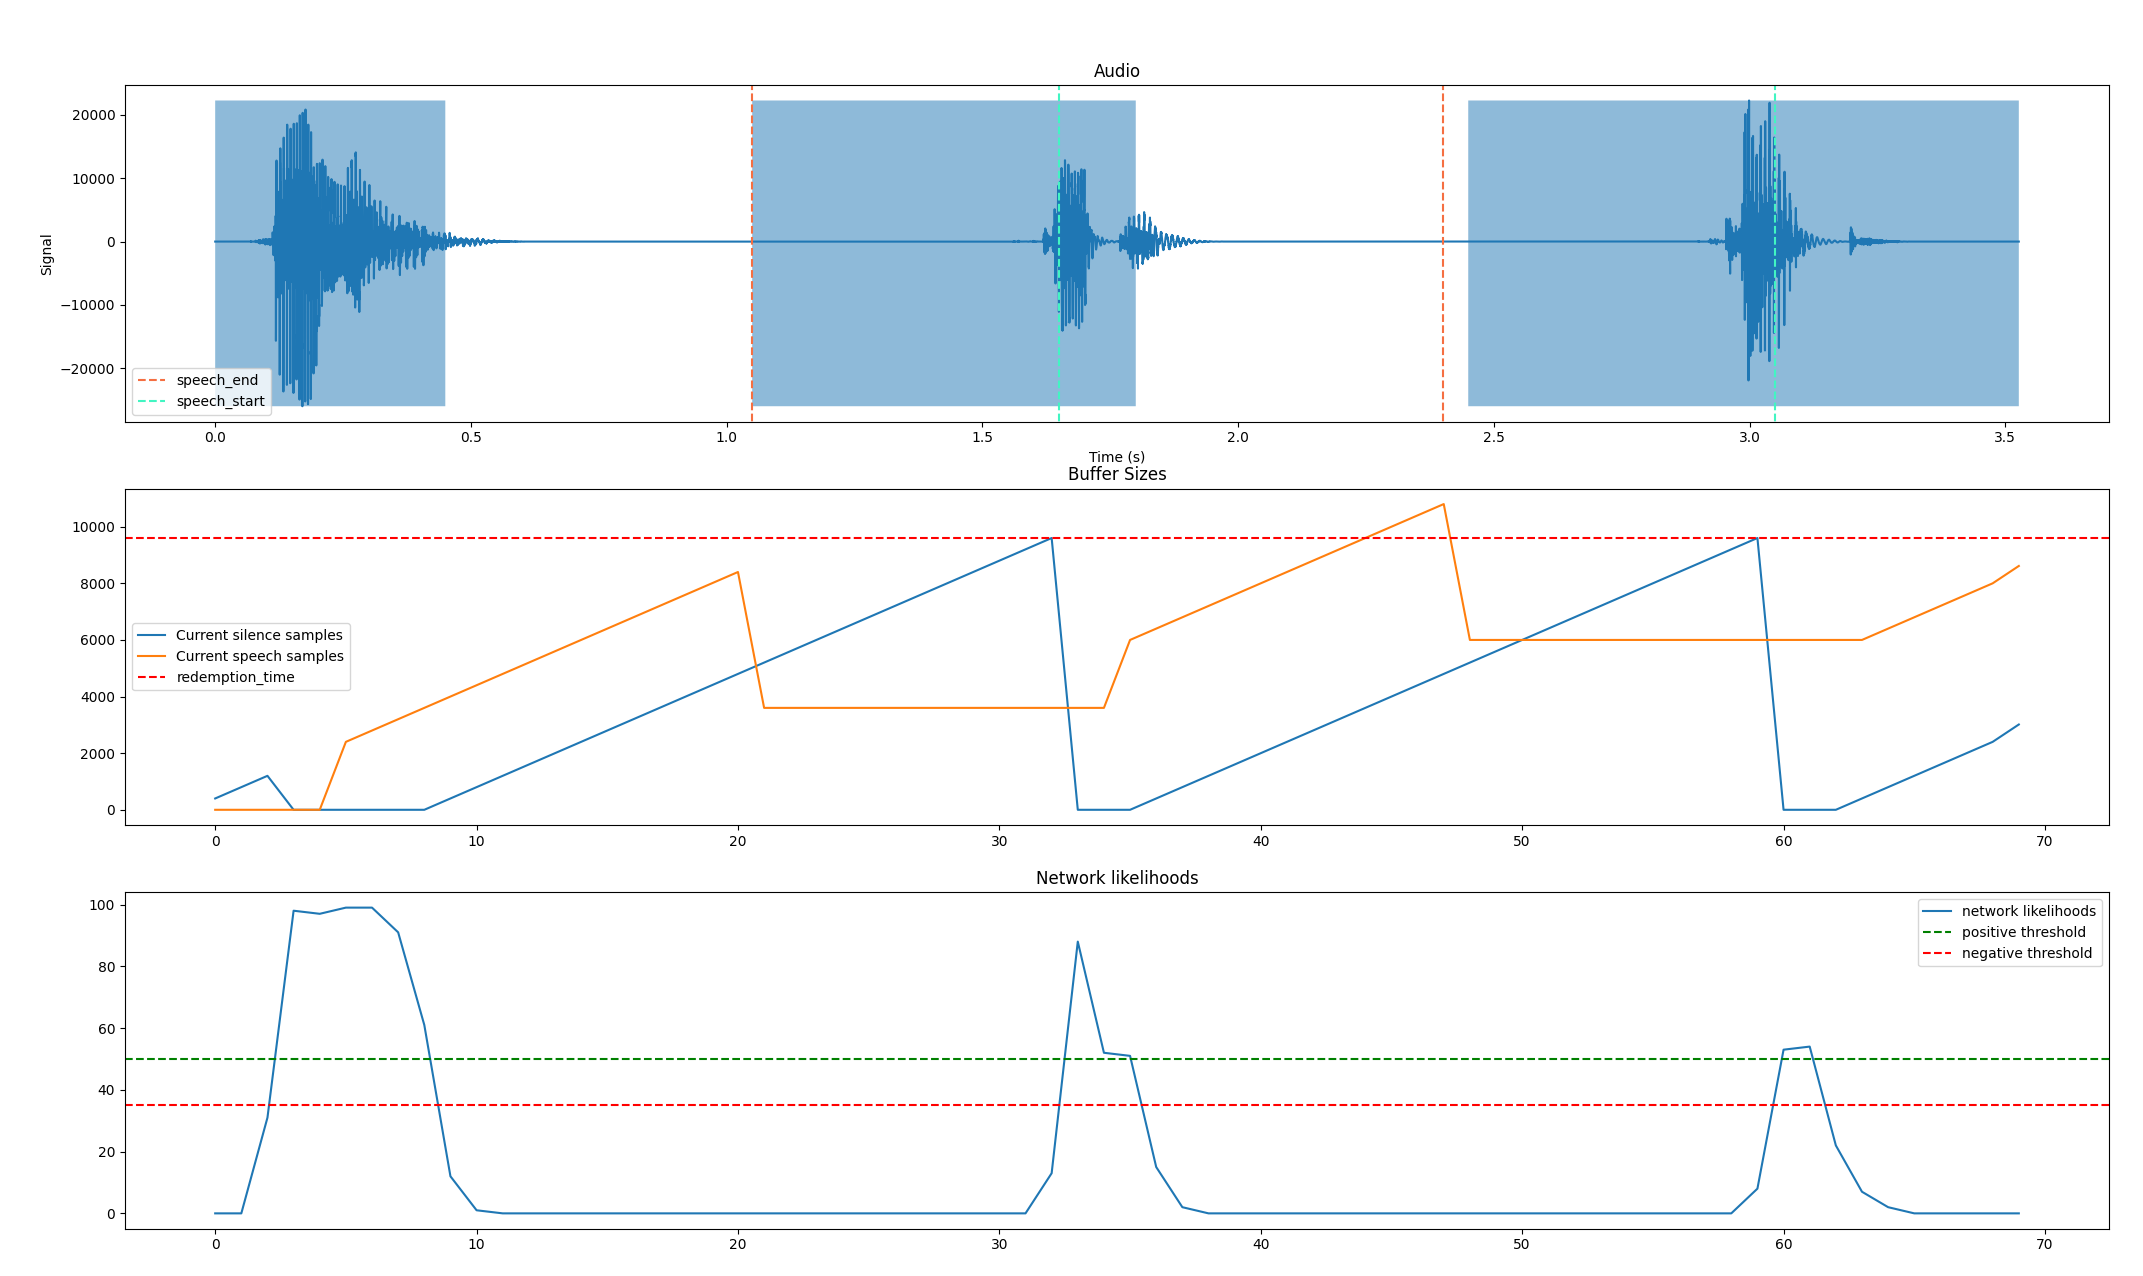
Extra post posting edit, this Monday I’ve updated it to include the network outputs into the snapshot tests!
Fun Bonus Bug-fix
While developing this and testing with chunk sizes below a VAD frame (30ms) I found that none of the samples triggered with 20ms chunk sizes. This is far smaller than anything we’ve tried in prod but there was a little issue with handling remainders that meant that all the samples were ignored. We also found a repeat processing issue on chunk sizes that aren’t a multiple of 30ms which led to the remainder being processed twice. You can see a bit of these in the PRs I’ll link down below:
Conclusion
Snapshot testing does have its downsides. If you’re not vetting the snapshots, the data isn’t realistic or they’re treated with a lack of care they could make a project look more mature than it is. If they’re brittle and change often the overhead on developers to push forwards simple changes can be too painful. However, for hard-to-test code particularly code where tests can help drive the development and debugging process more interactively they can prove to be a powerful tool to complement your other testing methods. I hope this post has proven somewhat enlightening and I did enjoy getting to prototype and merge in an idea I’ve been playing around in my head for a while.
As a final note on more general snapshot testing of neural networks or machine learning algorithms. Often you will be porting from Python to Rust, so collecting snapshots from the Python code and then using them to test the Rust port is a good approach to be confident in your ported implementation.
Thanks to blueridanus for working with me on this and others for proofreading and offering feedback on initial versions of this post.